Handling Monstera aerial roots during repotting can be challenging, but it’s essential for the plant’s health and growth. This guide provides 7 expert techniques to ensure a smooth repotting process, from recognizing when to repot to choosing the right pot size and preventing transplant shock. Learn essential tools, step-by-step instructions, and post-repotting care tips to keep your Monstera thriving. Whether you’re a beginner or an experienced plant parent, these strategies will help you repot with confidence while maintaining healthy aerial roots.
Key Takeaways:
- – Timing is crucial – watch for signs like roots growing through drainage holes, slowed growth, or your Monstera outgrowing its current pot before repotting.
- – Proper preparation matters – gather essential tools and select a well-draining soil mix with equal parts peat moss for optimal growth.
- – Aerial root management is vital – these roots are crucial for your Monstera’s health and should be carefully handled during the repotting process.
- – The right pot size makes a difference – choose a container 2-3 inches larger than the current one, ensuring adequate drainage holes for your tropical plant.
- – Support systems are essential – consider adding a moss pole or coco coir pole to support your mature plant’s growth and aerial roots.
Signs Your Monstera Needs Repotting
Recognizing when your Monstera needs a new home is crucial for maintaining its health and vigor. Several telltale signs indicate it’s time to consider repotting your plant.
Visible Root Growth
When roots start emerging from drainage holes or growing on the soil surface, it’s a clear indicator your Monstera has outgrown its current pot. These exposed roots are searching for more space and nutrients, signaling the need for a larger container.
Slowed Growth Rate
If your once-vigorous Monstera shows decreased growth despite proper care and optimal growing conditions, it might be root-bound. Plants struggling for space and nutrients typically exhibit stunted growth patterns.
Water Management Issues
Notice your plant requiring more frequent watering than usual? When roots become densely packed, they leave little space for soil to retain moisture. This results in rapid water drainage and increased watering needs.
Physical Container Signs
Inspect your pot for bulging sides or cracks. A root-bound Monstera can exert enough pressure to deform plastic containers or even crack ceramic ones. If you spot any structural changes in the pot, it’s time to repot.
Soil Condition
When the soil appears compacted or breaks away from the pot’s edges, it’s another sign your Monstera needs repotting. This condition reduces water retention and nutrient availability, potentially harming your plant’s health.
Seasonal Timing
While these signs can appear anytime, spring and early summer are ideal for repotting. During these seasons, Monsteras experience active growth, making them more resilient to the stress of transplanting.
💡 Key Takeaway: Monitor your Monstera for exposed roots, slower growth, frequent watering needs, pot damage, and soil compaction – these key indicators signal it’s time for repotting to ensure continued healthy growth.
Essential Tools and Materials
Gathering Your Supplies
Before starting your Monstera repotting project, assembling the right tools is crucial for success. A clean, sharp pair of pruning shears is essential for trimming any damaged roots or stems. You’ll also need gardening gloves to protect your hands while handling the plant and soil.
Having a clean workspace with newspaper or a drop cloth helps contain mess and makes cleanup easier. Keep a spray bottle filled with water nearby to mist aerial roots and maintain moisture during the process.
Selecting the Right Container
Choose a pot that’s 2-3 inches larger in diameter than your current one. Ensure it has adequate drainage holes to prevent water logging. While plastic pots are lightweight and affordable, terracotta pots offer better breathability for roots.
The potting mix should be well-draining and rich in organic matter. A combination of regular potting soil, perlite, and orchid bark creates ideal growing conditions for Monstera. Add a moss pole or trellis if you want to support vertical growth.
Don’t forget to have a watering can and humidity meter handy to monitor moisture levels during and after repotting. A gentle plant brush can help clean leaves and remove dust before the process.
💡 Key Takeaway: Successful Monstera repotting requires proper tools and materials – sharp pruning shears, well-draining pot with drainage holes, quality potting mix, and essential care items for optimal results.
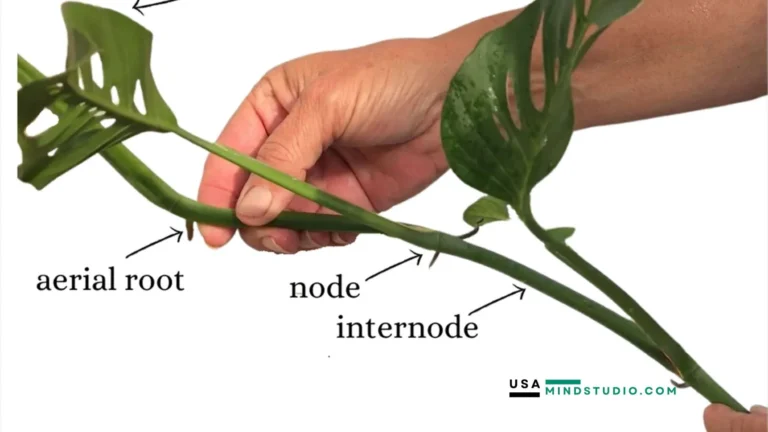
Understanding Monstera Aerial Roots
Aerial roots are a fascinating feature of Monstera plants, serving multiple essential functions in both their natural habitat and indoor environments. These specialized roots emerge from the plant’s nodes and play a crucial role in its growth and survival.
Natural Purpose of Aerial Roots
In their native tropical environments, Monstera plants use aerial roots to anchor themselves to trees and other surfaces. These roots help the plant climb upward towards light sources, supporting their epiphytic growth habit. They also absorb moisture and nutrients from the air and surrounding organic matter, supplementing the plant’s primary root system.
Identifying Healthy Aerial Roots
Healthy Monstera aerial roots typically appear brown or grayish-brown with a firm texture. They start as small nubs and can grow several feet long. When properly maintained, these roots should feel solid but not brittle, with a slightly rough surface texture. If you notice aerial roots that are mushy, black, or extremely dry, this may indicate underlying health issues.
Indoor Growth Patterns
When grown indoors, Monstera aerial roots continue to develop but may serve slightly different purposes. While they still seek support and attempt to climb, they primarily function as additional anchoring points and supplementary nutrient gatherers. These roots often grow more prominently when the plant receives adequate humidity and proper care.
Benefits for Plant Health
Aerial roots contribute significantly to your Monstera’s overall health by:
– Providing structural support for larger leaves
– Increasing nutrient and water absorption capacity
– Helping stabilize the plant as it grows larger
– Enabling natural climbing behavior
– Supporting photosynthesis through improved plant positioning
Environmental Impact on Root Development
The development of aerial roots is heavily influenced by environmental conditions. Higher humidity levels typically encourage more robust aerial root growth, while proper light exposure helps direct their growth pattern. Temperature stability and consistent moisture levels also play crucial roles in healthy aerial root development.
💡 Key Takeaway: Monstera aerial roots are vital plant organs that provide support, enable climbing, and enhance nutrient absorption, requiring proper environmental conditions to develop healthily in indoor settings.
Preparing Your Monstera for Repotting
Before diving into the repotting process, proper preparation is crucial for your Monstera’s health and successful transition. Taking the right steps beforehand can make a significant difference in how well your plant adapts to its new home.
Assess Plant Health
Start by examining your Monstera’s overall condition. Look for signs of pest infestation, diseases, or nutrient deficiencies. A healthy plant will handle the stress of repotting much better than a struggling one. Check the leaves for any discoloration, spots, or unusual patterns that might indicate underlying issues.
Timing Considerations
Choose the right season for repotting. Spring and early summer are ideal as your Monstera is naturally in its active growth phase. Avoid repotting during winter when the plant is dormant, as this can slow recovery and increase the risk of transplant shock.
Gather Essential Materials
Prepare all necessary supplies before starting:
– A new pot 2-3 inches larger than the current one
– Well-draining potting mix
– Clean, sharp pruning shears
– Support stake or moss pole
– Gloves for protection
– Watering can
Pre-Repotting Care
Water your Monstera thoroughly 24-48 hours before repotting. This helps reduce stress and makes it easier to remove the plant from its current pot. Moist soil also helps keep the root ball intact during transfer. However, avoid overwatering as soggy soil can make the process messy and increase the risk of root damage.
Workspace Setup
Create a clean, spacious work area. Lay down newspaper or a tarp to catch soil spillage. Ensure good lighting to see what you’re doing clearly. Having everything organized and within reach will make the repotting process smoother and more efficient.
💡 Key Takeaway: Successful Monstera repotting starts with thorough preparation – assess plant health, choose the right timing, gather materials, provide pre-repotting care, and set up an organized workspace for optimal results.
Step-by-Step Aerial Root Management
Managing aerial roots during Monstera repotting requires careful attention and proper technique. Let’s explore the essential steps to handle these unique structures effectively while ensuring your plant’s health and growth.
Preparation and Assessment
Before handling aerial roots, inspect their condition carefully. Healthy aerial roots should be firm and light brown to grayish in color. Remove any soft, mushy, or blackened roots using clean, sharp pruning shears. This initial assessment helps prevent potential issues during the repotting process.
Gather all necessary supplies including a well-draining potting mix, clean pruning tools, and a suitable support structure like a moss pole or trellis. Having everything ready beforehand makes the process smoother and reduces stress on your plant.
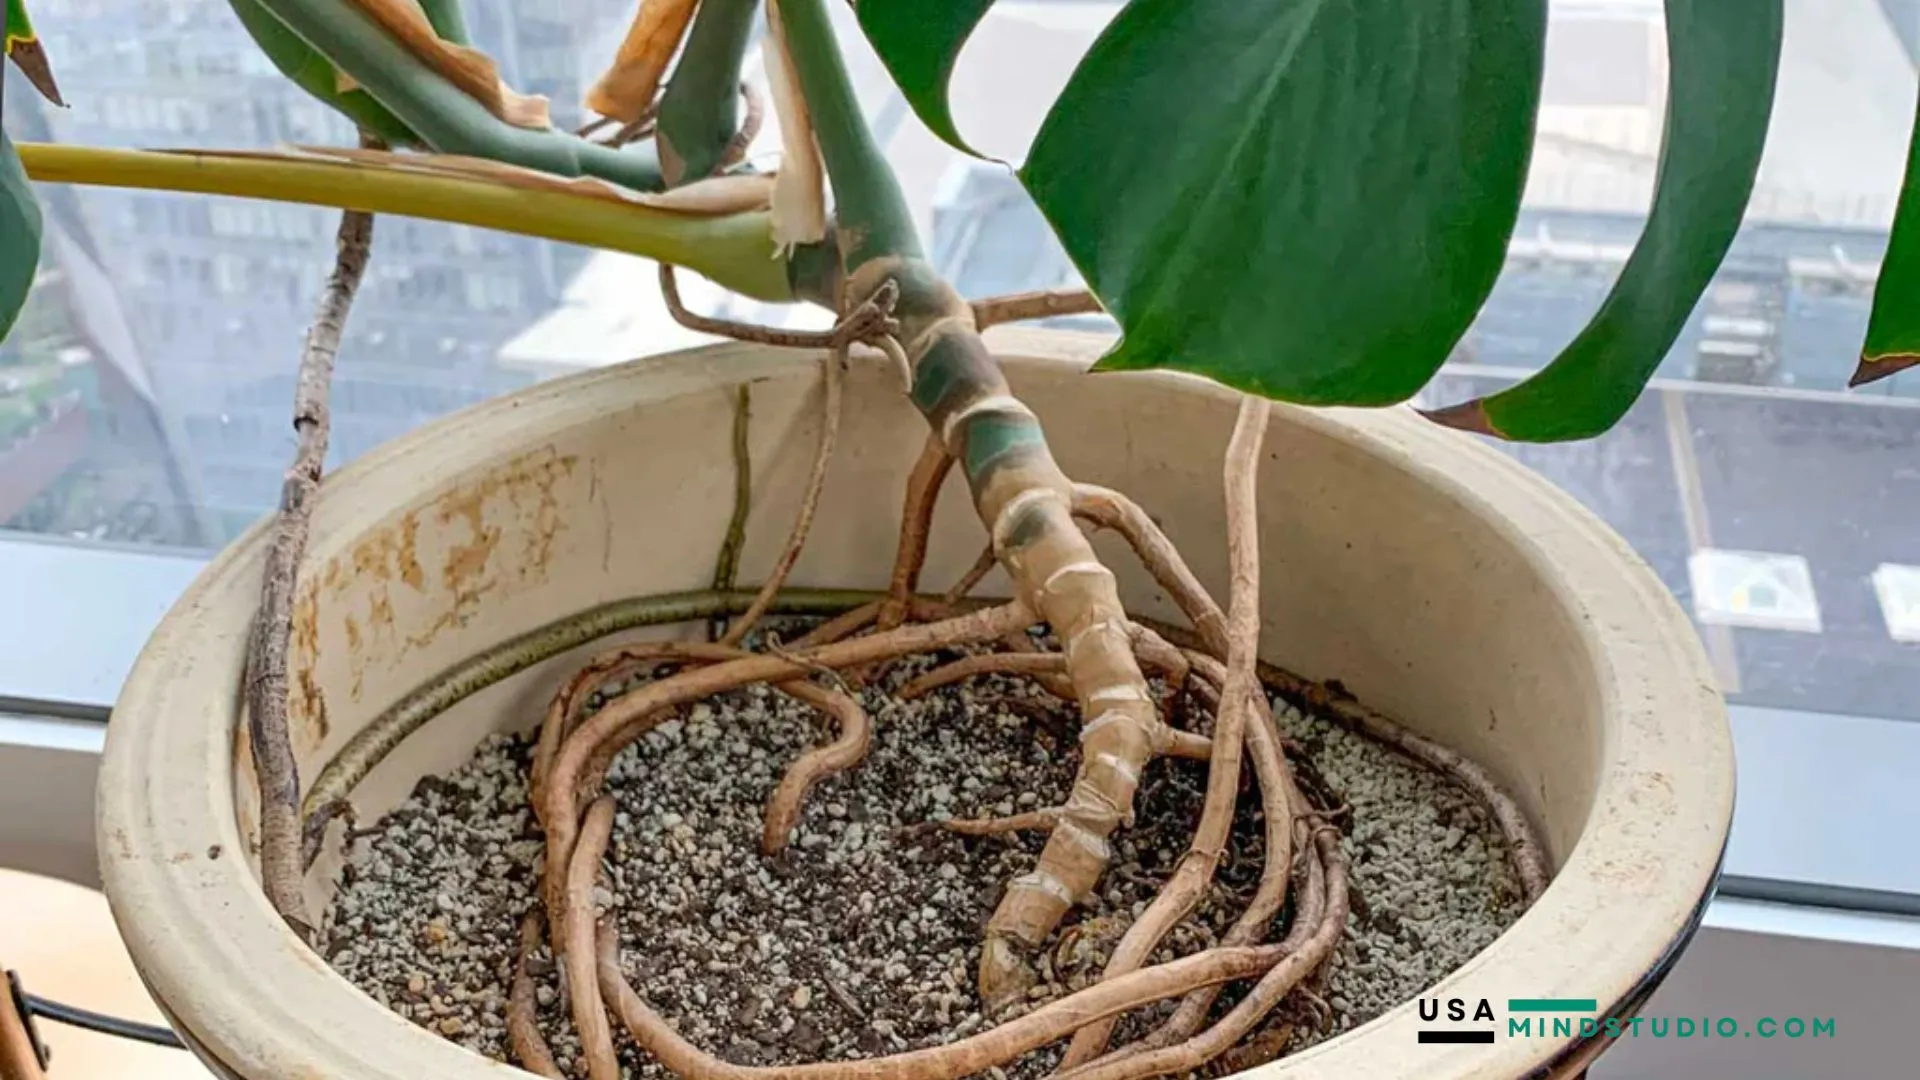
Managing Aerial Roots During Repotting
Start by gently removing the plant from its current pot. If aerial roots have attached themselves to the pot, carefully loosen them to prevent damage. For roots that have grown through drainage holes, trim them cleanly at the base of the pot.
Position your Monstera in its new container while arranging the aerial roots. You have several options:
– Direct longer aerial roots back into the soil
– Guide them up a moss pole or trellis
– Allow them to hang naturally if they’re healthy and not too long
When using a support structure, secure aerial roots against the pole using plant ties or soft twine. Avoid tight binding that could damage the roots as they continue to grow.
Post-Repotting Care
After repotting, maintain slightly higher humidity around the plant to help aerial roots adapt. Mist the moss pole or support structure regularly if you’re training the roots to climb. This mimics their natural environment and encourages proper growth.
Monitor the plant closely for the first few weeks after repotting. Some aerial roots may show signs of stress, but healthy ones will typically adjust and resume growth within a month. Maintain consistent watering without overwatering, as this can lead to root rot.
💡 Key Takeaway: Successful aerial root management during Monstera repotting involves careful preparation, gentle handling, and proper post-repotting care to ensure healthy growth and adaptation to the new environment.
Post-Repotting Care Guide
After repotting your Monstera, the next few weeks are crucial for its recovery and adaptation. Proper post-repotting care ensures your plant transitions smoothly to its new home while minimizing stress.
Watering Schedule Adjustments
Wait 24-48 hours before the first watering after repotting. This allows any damaged roots to heal and helps prevent root rot. When you do water, ensure thorough saturation but avoid waterlogging. Monitor soil moisture carefully in the first few weeks, as the plant’s water needs may change in its new container.
Environmental Conditions
Maintain consistent temperature between 65-85°F (18-29°C) and humidity levels above 60%. Place your repotted Monstera away from direct sunlight and drafts for the first week. This stable environment helps reduce transplant shock and promotes faster recovery.
Growth Support
Secure any aerial roots and climbing stems to their support structure. If using a moss pole, keep it slightly moist to encourage aerial root attachment. Ensure the plant is stable and won’t topple as it adjusts to its new pot.
Monitoring Signs of Stress
Watch for yellowing leaves, wilting, or leaf drop in the first few weeks – these are common signs of transplant shock. Some leaf drop is normal, but excessive yellowing might indicate watering issues. Check the soil moisture level before making any watering adjustments.
Recovery Timeline
Most Monsteras show signs of new growth within 4-6 weeks after repotting. During this period, avoid fertilizing and focus on maintaining optimal growing conditions. Resume regular fertilization only after you notice new growth emerging.
💡 Key Takeaway: Focus on maintaining stable conditions and proper watering during the first 4-6 weeks after repotting, while closely monitoring your Monstera for signs of stress or new growth.
Troubleshooting Common Issues
During the Monstera repotting process, several issues might arise. Let’s explore common problems and their effective solutions to ensure your plant thrives in its new home.
Yellow or Drooping Leaves
If your Monstera’s leaves turn yellow or start drooping after repotting, this typically indicates transplant shock. Maintain consistent watering, avoid direct sunlight, and ensure proper humidity levels around 60-70%. The plant usually recovers within 2-3 weeks with proper care.
Root Damage
Accidentally damaged roots during repotting can stress your Monstera. Trim any broken or mushy roots with clean, sharp scissors. Apply a fungicide to prevent infection and ensure the new pot has adequate drainage to prevent root rot.
Soil Settlement
Sometimes the soil settles too much after repotting, leaving aerial roots exposed. Add fresh, well-draining potting mix to maintain proper soil levels. This helps stabilize the plant and provides essential nutrients to the developing root system.
Unstable Plant Position
A wobbly Monstera after repotting can stress the root system. Secure the plant with a moss pole or stake, ensuring it’s firmly anchored in the soil. This support helps aerial roots attach and promotes upward growth.
Overwatering Anxiety
Many plant parents tend to overwater after repotting. Wait until the top 2-3 inches of soil feels dry before watering. Use a moisture meter to monitor soil moisture levels accurately and prevent root rot issues.
Slow Growth Response
Don’t worry if your Monstera seems dormant after repotting. The plant needs time to establish its root system in the new environment. Maintain consistent care routines and avoid fertilizing for at least 4-6 weeks post-repotting.
💡 Key Takeaway: Address common repotting issues promptly by monitoring plant health, maintaining proper moisture levels, and providing adequate support while allowing time for adjustment to prevent long-term problems.
Conclusion
Repotting your Monstera and managing its aerial roots is simple with the right approach. Follow these seven essential tips to ensure a smooth transition, prevent transplant shock, and promote healthy growth. Focus on timing, pot selection, root care, and post-repotting maintenance for the best results. With patience and proper techniques, your Monstera will thrive with larger, healthier leaves.
FAQs
Can I cut off Monstera aerial roots if they become too long or unmanageable?
While it’s possible to trim aerial roots, it’s not recommended unless absolutely necessary. These roots play a vital role in providing stability and nutrients to your monstera plant. If you must trim, use clean, sharp scissors and cut only damaged or extremely intrusive roots.
How often should I repot my Monstera plant?
Young Monstera plants typically need repotting every 12-18 months, while mature plants can go 2-3 years between repotting. Watch for signs like roots growing through drainage holes or slowed growth to determine when it’s time for a pot upgrade.
What’s the best soil mix for repotting Monstera?
Create a well-draining mix using equal parts peat moss, standard houseplant soil, and perlite. This combination provides adequate moisture retention while ensuring proper drainage. You can also add orchid bark for extra aeration.
Should I water my Monstera immediately after repotting?
Yes, water your Monstera thoroughly but gently after repotting. This helps settle the soil around the roots and reduces transplant shock. Keep the soil moist but not waterlogged for the first few weeks as the plant establishes itself in its new pot.
What season is best for repotting Monstera?
Spring and early summer are ideal for repotting Monstera plants. During these seasons, the tropical plant is in its active growth phase, making it more resilient to the stress of repotting and better able to establish itself in its new container.
How do I know if my Monstera pot is too big?
A pot that’s too large can lead to overwatering issues and root rot. Choose a container that’s only 2-3 inches larger than the current pot. The root ball should occupy about 75% of the new pot’s volume for optimal growth conditions.