Propagating Monstera Adansonii is a simple and rewarding process. This guide covers water, soil, and air layering methods to help you successfully grow new plants from stem cuttings with nodes. With proper care, roots develop within 2-4 weeks. Learn how to select healthy stems, follow step-by-step propagation instructions, and troubleshoot common issues. Whether you’re a beginner or experienced plant parent, this guide will help you expand your Swiss Cheese Vine collection with ease.
Key Takeaways:
- – The three main propagation methods are water propagation, soil propagation, and air layering, with water propagation being the most popular for its high success rate.
- – Successful propagation requires healthy stem cuttings with at least one node, which is essential for root development. The best time to take cuttings is during the growing season.
- – Water propagation offers clear visibility of root development, while soil propagation provides a low-risk way to grow new plants directly in their final medium.
- – Air layering, though more complex, is particularly effective for larger Swiss Cheese plants and allows roots to develop while still attached to the parent plant.
- – High humidity, indirect sunlight, and proper temperature (around 65-80°F) are crucial factors for successful propagation regardless of the method chosen.
Essential Tools and Materials for Propagation
Before diving into propagation, gathering the right tools and materials is crucial for success. Having everything ready ensures a smooth process and increases your chances of successful propagation.
Basic Cutting Tools
A clean, sharp pair of pruning shears or scissors is essential for making precise cuts. Sterilize your tools with rubbing alcohol before use to prevent infection. Garden pruners work well for thicker stems, while precision scissors are perfect for delicate cuttings.
Propagation Mediums
For water propagation, you’ll need clear glass containers or jars filled with room temperature filtered water. If choosing soil propagation, prepare well-draining potting mix specifically designed for aroids. For air layering, sphagnum moss is your go-to medium.
Support Materials
Gather plant stakes or moss poles to support new growth. Clear plastic wrap or bags help maintain humidity during air layering. Small rubber bands or plant ties secure moss and plastic around stems during the rooting process.
Optional but Helpful Items
– Rooting hormone powder or gel to encourage faster root development
– pH meter to monitor water quality
– Small spray bottle for misting
– Heat mat to provide bottom warmth
– Clear plastic dome or propagation box for humidity control
Cleaning Supplies
Keep rubbing alcohol, paper towels, and clean cloths handy for sterilizing tools and containers. This prevents bacterial growth and fungal issues during propagation.
💡 Key Takeaway: Success in Monstera adansonii propagation starts with having the right tools – clean cutting implements, appropriate growing mediums, and proper support materials ensure healthy root development and growth.
Identifying the Perfect Cutting
A successful Monstera Adansonii propagation journey begins with selecting the right cutting. The quality of your cutting directly impacts the success rate of your propagation efforts.
Selecting Healthy Stems
Look for stems that are firm, green, and disease-free. Avoid stems that show signs of yellowing, browning, or any spots that might indicate disease. The ideal stem should be at least 4-6 inches long and have multiple nodes.
The stem should feel sturdy when gently bent – if it’s too soft or mushy, it won’t be suitable for propagation. Ensure the stem you choose comes from a healthy parent plant that’s been growing well.
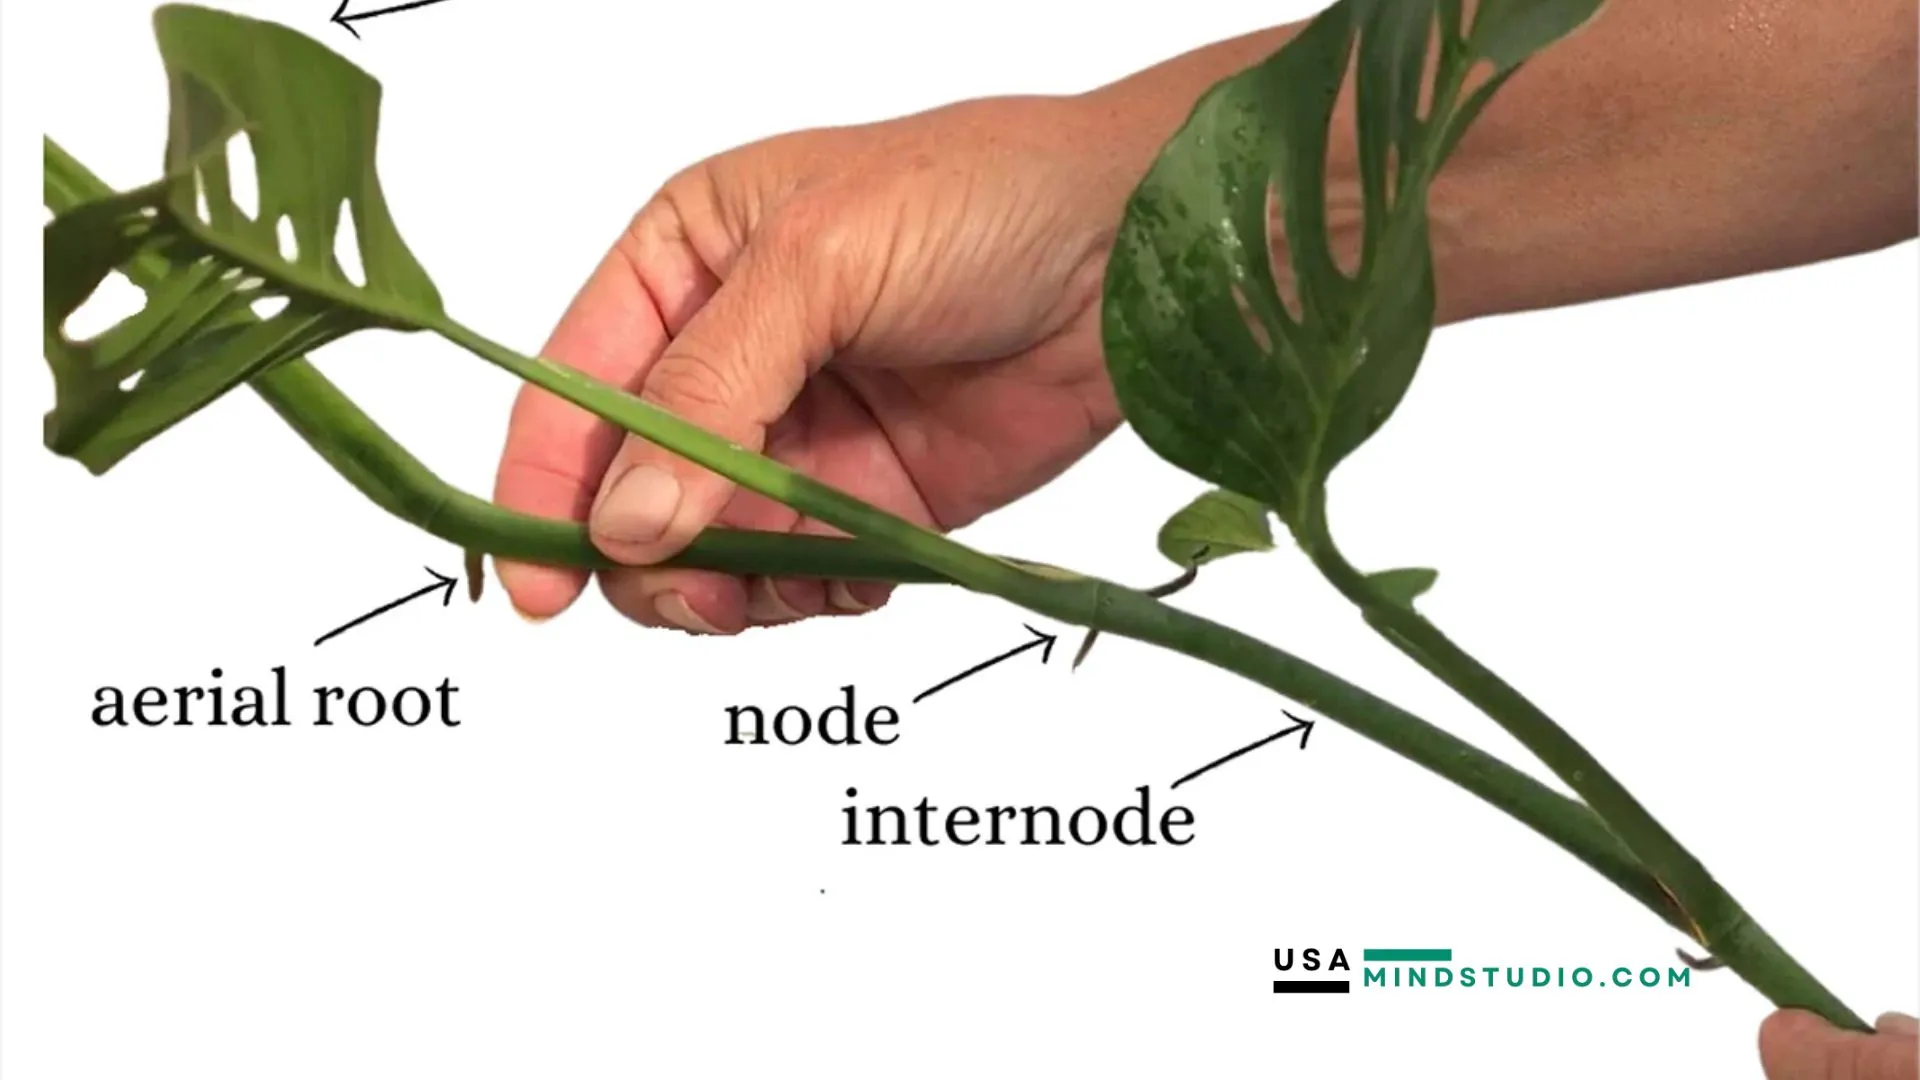
Identifying Viable Nodes
Nodes are the small, brown bumps along the stem where leaves and aerial roots emerge. These are crucial for propagation as they contain the growth tissue necessary for developing new roots. Choose a cutting with at least 2-3 nodes for better success rates.
The nodes should be plump and healthy-looking. Some nodes might already have aerial roots growing from them – these are excellent candidates for propagation as they show active growth potential.
Making the Perfect Cut
Using clean, sharp scissors or pruning shears, make a clean cut about 1/4 inch below a node. The cut should be at a 45-degree angle to maximize the surface area for root development. Always sterilize your cutting tools with rubbing alcohol before making any cuts to prevent infection.
Ensure each cutting has 1-2 leaves attached. While leaves help with photosynthesis, too many can stress the cutting during root development. If your cutting has multiple leaves, consider removing some to reduce the energy demand on the developing roots.
Preparing the Cutting
After making the cut, let it sit for 1-2 hours to allow the cut end to callus slightly. This helps prevent rot when you place it in water or soil. Remove any leaves that would be below the propagation medium to prevent rotting.
Inspect the cutting one final time for any damage or signs of stress. A healthy cutting should look fresh and vibrant, ready to start its journey toward becoming a new plant.
💡 Key Takeaway: Select a healthy stem with 2-3 nodes, make a clean 45-degree cut below a node, and allow the cutting to callus before propagation to ensure successful root development.
Water Propagation Method
Water propagation is one of the most popular and effective methods for propagating Monstera adansonii. This method allows you to monitor root development closely and provides excellent success rates for beginners.
Preparing Your Cutting
Before starting the water propagation process, select a healthy stem with at least one node and 1-2 leaves. Using clean, sharp scissors or pruning shears, make a clean cut just below the node. Remove any leaves that would be submerged in water to prevent rotting.
The node is crucial for successful propagation as it contains the growth cells necessary for root development. Ensure your cutting has at least one aerial root or node point for optimal results.
Setting Up the Container
Choose a clear glass container that’s large enough to support your cutting while keeping it upright. Fill it with room temperature water, preferably filtered or distilled, as tap water may contain chemicals that could hinder root growth.
Place the cutting in the container so the node is submerged but any remaining leaves stay above water. Position the container in a spot with bright, indirect light – direct sunlight can overheat the water and damage the developing roots.
Maintaining Optimal Conditions
Change the water every 3-4 days to prevent bacterial growth and maintain oxygen levels. Keep the water temperature between 68-75°F (20-24°C) for best results. Maintain moderate humidity around the cutting by misting the leaves occasionally.
You should start seeing small white root nubs emerging from the node within 2-3 weeks. These will gradually lengthen and develop into a robust root system.
Transitioning to Soil
Once the roots reach 2-3 inches in length and develop secondary roots, your cutting is ready for soil transfer. This typically occurs after 4-6 weeks of water propagation. Prepare a well-draining potting mix with equal parts peat moss, perlite, and orchid bark.
When transferring, handle the roots gently to avoid damage. Plant the cutting at the same depth it was growing in water, and water thoroughly. Keep the soil consistently moist for the first few weeks to help the plant adjust to its new growing medium.
Troubleshooting Common Issues
If you notice the cutting turning yellow or brown, it might be receiving too much direct sunlight. Move it to a shadier spot. If the water becomes cloudy quickly, increase the frequency of water changes. For cuttings that aren’t developing roots after 4 weeks, try adding a small amount of rooting hormone to the water.
💡 Key Takeaway: Water propagation offers a simple, visible way to root Monstera adansonii cuttings, with success typically achieved in 4-6 weeks when proper conditions are maintained and regular water changes are performed.
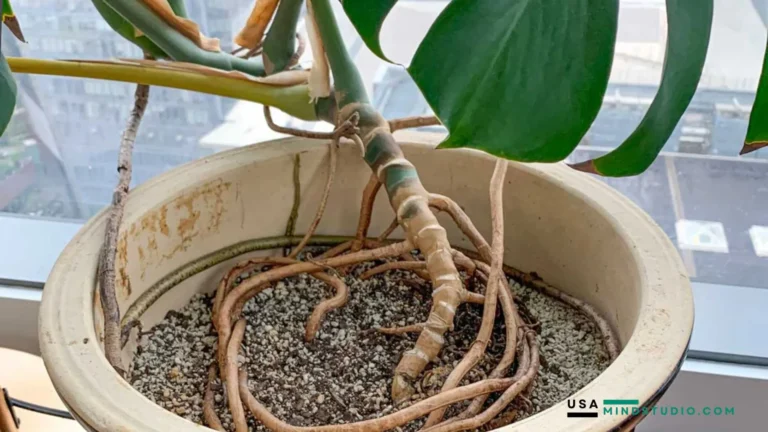
Soil Propagation Technique
The soil propagation method offers a direct and reliable way to grow new Monstera Adansonii plants. This technique allows roots to develop directly in their final growing medium, reducing transplant shock and stress on the cutting.
Preparing the Soil Mix
Create a well-draining potting mix by combining regular potting soil with perlite and orchid bark in a 2:1:1 ratio. This mixture provides adequate aeration and moisture retention, crucial for successful root development. Pre-moisten the soil before planting to ensure even moisture distribution.
Selecting and Preparing the Cutting
Choose a healthy stem with at least one node and 2-3 leaves. Make a clean cut just below the node using sterilized pruning shears. Remove any leaves that would be buried in the soil to prevent rotting. Allow the cut end to callus for 1-2 hours before planting.
Planting Process
Make a small hole in the prepared soil mix using your finger or a pencil. Insert the cutting so the node is buried about 1-2 inches deep, ensuring good soil contact. Gently firm the soil around the base of the cutting to provide stability and eliminate air pockets.
Environmental Conditions
Place the newly planted cutting in bright, indirect light. Maintain temperatures between 70-80°F (21-27°C) and humidity levels above 60%. Consider using a clear plastic bag or propagation dome to create a greenhouse effect, but ensure proper ventilation to prevent fungal growth.
Watering and Maintenance
Keep the soil consistently moist but not waterlogged. Water when the top inch of soil feels dry, typically every 3-4 days. Avoid overwatering as this can lead to root rot. Mist the leaves regularly to maintain humidity and support healthy growth.
Signs of Success
Look for new leaf growth and slight resistance when gently tugging the cutting after 4-6 weeks, indicating root development. Once established, gradually reduce humidity levels and transition to regular watering schedules over 2-3 weeks.
💡 Key Takeaway: Soil propagation of Monstera Adansonii requires well-draining soil, proper node selection, and consistent moisture levels. Success depends on maintaining optimal environmental conditions and patient care during the rooting process.
Air Layering Process
Air layering is an advanced propagation technique that allows you to grow roots on a Monstera adansonii while it’s still attached to the parent plant. This method typically yields higher success rates compared to traditional cutting methods.
Required Materials
– Sharp, sterilized knife or blade
– Sphagnum moss
– Plastic wrap
– Plant ties or twist ties
– Rooting hormone (optional)
Selecting the Right Node
Choose a healthy stem with at least one aerial root or node. The selected area should be below a leaf node and approximately 12 inches from the stem tip. Ensure the stem is thick enough to support the air layering process.
Preparing the Node
Carefully remove any leaves near the chosen node. Using your sterilized knife, make a small upward diagonal cut about 1/3 through the stem. This wound creates a point where new roots will develop.
Applying Moss and Wrap
Moisten the sphagnum moss thoroughly and squeeze out excess water. Wrap a generous amount around the wounded area, ensuring complete coverage. Secure the moss with plastic wrap, creating a tight seal above and below the node to maintain humidity.
Maintenance and Monitoring
Keep the moss consistently moist but not waterlogged. You can mist through small holes in the plastic wrap or carefully unwrap and remoisten as needed. Root development typically begins within 3-4 weeks, appearing as white tendrils through the moss.
Separating from Parent Plant
Once you observe substantial root growth (usually after 6-8 weeks), cut below the rooted section. Remove the plastic wrap carefully, leaving the moss intact. Plant your newly rooted section in well-draining potting mix, maintaining higher humidity during the transition period.
💡 Key Takeaway: Air layering provides a reliable way to propagate Monstera adansonii while ensuring root development before separation, resulting in stronger plants with higher success rates compared to other methods.
Optimal Growing Conditions
Creating the perfect environment for your Monstera adansonii propagation is crucial for success. Let’s explore the ideal conditions that will help your cuttings thrive and develop strong roots.
Light Requirements
Place your propagating cuttings in bright, indirect light. Direct sunlight can stress the developing roots and burn the leaves. A north or east-facing window provides the perfect balance of light intensity. If using artificial light, position grow lights 12-18 inches above the cuttings for 12-14 hours daily.
Temperature Control
Maintain temperatures between 65-85°F (18-29°C) for optimal root development. Avoid placing cuttings near drafty windows or air conditioning vents, as temperature fluctuations can slow down growth. Consistent warmth encourages faster root formation and stronger plant development.
Humidity Levels
Monstera adansonii cuttings thrive in humidity levels between 60-80%. Use a humidity tray filled with pebbles and water, or place a clear plastic bag over the cutting to create a mini greenhouse effect. Regular misting helps maintain moisture levels, especially during the initial rooting phase.
Air Circulation
While humidity is important, proper air flow prevents fungal issues. Ensure moderate air circulation around your cuttings without creating strong drafts. If using a humidity dome or plastic bag, open it briefly each day to exchange fresh air and prevent stagnation.
Water Quality
Use room temperature, filtered water for your propagation setup. Chlorinated tap water can inhibit root development, so let it sit out for 24 hours before use. Change the water every 5-7 days to maintain oxygen levels and prevent bacterial growth.
💡 Key Takeaway: Success in Monstera adansonii propagation relies on maintaining bright indirect light, temperatures of 65-85°F, high humidity, good air circulation, and clean water for optimal root development.
Post-Propagation Care
After successfully propagating your Monstera adansonii, proper care is essential for ensuring your new plant thrives in its environment. The transition period requires careful attention to help your plant establish strong roots and healthy growth patterns.
Transitioning to Soil
When moving water-propagated cuttings to soil, choose a well-draining potting mix enriched with organic matter. Plant the rooted cutting at the same depth it was growing in water, ensuring the roots are completely covered. Water thoroughly and maintain slightly higher moisture levels during the first few weeks to help the plant adjust.
Environmental Conditions
Place your newly potted Monstera adansonii in bright, indirect light. Direct sunlight can stress the developing plant. Maintain temperatures between 65-80°F (18-27°C) and humidity levels around 60%. Consider using a humidity tray or small humidifier if your home’s air is dry.
Watering Schedule
For the first two weeks, keep the soil consistently moist but not waterlogged. After this period, gradually reduce watering frequency to establish a normal schedule. Wait until the top 1-2 inches of soil feels dry before watering again. This encourages deeper root growth and prevents root rot.
Fertilization Guidelines
Hold off on fertilizing for the first month after propagation. Once new growth appears, begin feeding with a balanced, water-soluble fertilizer diluted to half strength every 4-6 weeks during the growing season. This provides essential nutrients without overwhelming the developing root system.
Monitoring Growth
Watch for signs of new growth, which typically appears within 4-8 weeks after transitioning to soil. Yellow leaves or drooping may indicate adjustment stress – reduce light exposure and maintain consistent moisture until the plant stabilizes. Remove any dead or yellowing leaves to promote healthy growth.
Support and Training
As your Monstera adansonii grows, provide support using a moss pole or trellis. This helps the plant develop its natural climbing habit and promotes larger leaf growth. Gently tie stems to the support using soft plant ties or twine.
💡 Key Takeaway: Successful post-propagation care requires consistent monitoring of moisture levels, proper environmental conditions, and gradual introduction of fertilizer, while providing adequate support for climbing growth.
Conclusion
Propagating your Monstera Adansonii is an exciting journey that opens up endless possibilities for expanding your indoor jungle. By following the methods outlined in this guide – whether you choose water propagation, soil propagation, or air layering – you can successfully multiply your Swiss Cheese Vine and share its beauty with others. Remember that patience and proper care are key to successful propagation. While the process may take 2-4 weeks, the reward of watching new roots and leaves emerge from your cuttings makes it all worthwhile. Keep your propagations in bright, indirect light, maintain adequate humidity, and monitor them regularly for optimal results. Ready to start your propagation journey? Choose your preferred method, gather your supplies, and give your Monstera Adansonii cuttings the best chance at success. With proper attention to nodes, growing conditions, and care requirements, you’ll soon be enjoying new, healthy plants that carry on the distinctive charm of your original Swiss Cheese Vine.
FAQs
Can I propagate Monstera Adansoni during winter months?
While possible, propagating Monstera Adansonii during winter isn’t ideal. The plant’s growth naturally slows during colder months, leading to slower root development. For best results, propagate during spring or summer when the plant is actively growing and temperatures are warmer.
How long does it take for Monstera Adansonii cuttings to root?
In optimal conditions with high humidity and warm temperatures, Monstera Adansonii cuttings typically develop roots within 2-3 weeks. Complete root system development takes 4-6 weeks in water propagation and 6-8 weeks in soil propagation.
Why are my Monstera Adansonii cuttings turning yellow?
Yellowing cuttings often indicate overwatering, poor drainage, or too much direct sunlight. Ensure your propagation medium isn’t waterlogged, maintain proper humidity, and place the cutting in bright, indirect light to prevent leaf deterioration.
Can I propagate a Monstera Adansonii cutting without a node?
No, a leaf-only cutting without a node won’t successfully propagate. The node contains essential growth tissue and aerial roots necessary for new root development. Always ensure your cutting includes at least one healthy node for successful propagation.
How many cuttings should I place in one propagation container?
For optimal root development, place 1-2 cuttings per container. While you can root multiple cuttings together, keeping them separate reduces competition for nutrients and minimizes the risk of rot spreading between cuttings.
When is the best time to transfer water-propagated cuttings to soil?
Transfer water-propagated cuttings to well-drained soil when the roots are 2-3 inches long and show multiple root branches. This typically occurs 4-6 weeks after starting propagation. Wait for robust root development to ensure successful transplanting.